Drawing roses is a rewarding artistic endeavor that combines the elegance of nature with the precision of art. Whether you’re an experienced artist or just starting, to master the art of Drawing:kkboxly= Rose can enhance your skills and bring your artwork to life. In this comprehensive guide, we will explore various techniques, styles, and tips to help you draw a beautiful rose. We’ll cover everything from basic sketches to intricate details and shading, ensuring that you capture the essence of this timeless flower.
Understanding the Rose’s Structure
Anatomy of a Rose
Before you begin drawing, it’s essential to understand the rose’s structure. The rose consists of several key components:
- Petals: The most recognizable part of the rose, petals vary in number and arrangement. They often overlap, creating a layered effect.
- Sepals: These small, leaf-like structures support the petals. They typically appear at the base of the flower.
- Stem: The stem provides support to the flower and may have thorns, which add texture and interest to your drawing.
- Leaves: Rose leaves usually have a serrated edge and grow in an alternating pattern along the stem.
Observing Real Roses
To draw a realistic rose, spend some time observing real roses. Notice how the petals fold and curve, how light and shadow play on the surface, and the texture of the leaves and stem. Take photographs or make quick sketches to capture these details.
Basic Drawing Techniques
Choosing Your Materials
Select the right materials for your drawing, including:
- Pencils: Use a range of pencils from hard (H) to soft (B) for different effects. A 2B pencil works well for general sketching, while a 4B or 6B pencil adds depth and shading.
- Paper: Choose smooth or textured paper based on your preference. Smooth paper allows for detailed work, while textured paper adds character.
- Eraser: Use a kneaded eraser for precision and to lighten areas without smudging.
- Blending Tools: A blending stump or tissue can help create smooth transitions between shades.
Step-by-Step Guide to Drawing:kkboxly= Rose
Follow these steps to create a detailed drawing:kkboxly= Rose:
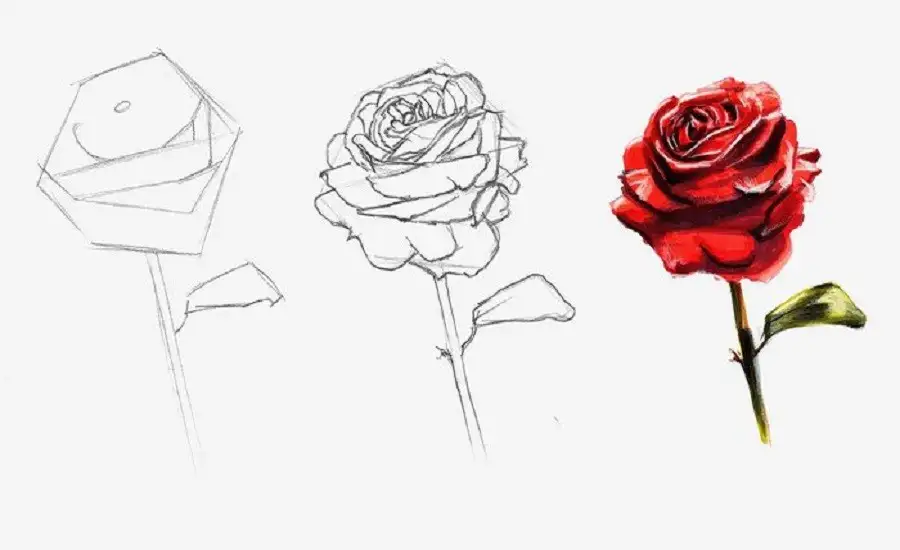
Step 1: Basic Shape and Guidelines
Start by drawing a circle for the rose’s main body and an oval for the bud. These shapes will guide you in placing the petals. Lightly sketch lines to indicate the petal’s direction and the stem’s position.
Step 2: Outline the Petals
Begin outlining the petals, starting from the center and working outward. Focus on capturing the curves and folds of each petal. Remember that rose petals often overlap, creating depth and complexity.
Step 3: Adding Details
Refine the petal outlines by adding details such as texture and vein lines. Observe your reference closely to mimic the natural patterns in the petals. Include the sepals at the base of the flower, ensuring they support the petals realistically.
Step 4: Drawing the Stem and Leaves
Sketch the stem, including any thorns that add realism to your drawing. Add leaves with attention to their serrated edges and natural shape. Arrange them to complement the rose’s composition.
Step 5: Shading and Depth
To give your rose drawing a three-dimensional appearance, apply shading. Identify the light source in your composition and shade areas that would naturally be in shadow. Use a soft pencil for dark areas and blend with a blending stump for smooth transitions. Highlight areas where light hits the petals for contrast and depth.
Exploring Different Styles
Drawing a rose allows you to experiment with various styles. Here are a few styles to consider:
- Realistic: Focus on capturing every detail, from petal texture to subtle color variations. Realistic drawings require careful observation and precise shading techniques.
- Stylized: Simplify the rose’s features to create a more graphic or abstract representation. Play with bold lines, exaggerated shapes, and vibrant colors for a unique look.
- Line Art: Use clean, precise lines to define the rose’s shape. This style emphasizes form and structure over shading, resulting in a minimalist yet striking image.
- Watercolor: Add a touch of color to your rose drawing with watercolor techniques. Use light washes for a delicate effect or bold colors for a more expressive piece.
Advanced Techniques
Capturing Texture
To enhance realism, focus on the texture of the rose. Experiment with different pencil strokes to represent the smoothness of petals, the roughness of leaves, and the thorny texture of the stem. Cross-hatching and stippling are effective techniques for adding texture.
Using Color
If you want to add color to your drawing, consider using colored pencils or watercolor paints. Blend colors smoothly to create realistic gradients and highlights. Pay attention to color temperature and how it affects the rose’s overall appearance.
Composition and Background
Think about the composition of your drawing:kkboxly= Rose and how the rose interacts with its background. A well-planned composition can enhance the visual impact of your artwork. Consider adding elements like a blurred background or additional flowers to create depth and context.
Experimenting with Lighting
Lighting plays a crucial role in creating mood and atmosphere. Experiment with different lighting setups to see how shadows and highlights change the rose’s appearance. Dramatic lighting can add drama and intensity to your drawing.
Tips for Successful Rose Drawings
- Practice Regularly: Like any skill, drawing improves with practice. Set aside time each day to work on your drawing skills.
- Use References: Collect a variety of reference images to study different roses. References help you understand diverse shapes, colors, and arrangements.
- Experiment and Have Fun: Don’t be afraid to try new techniques and styles. Experimentation leads to discovery and growth as an artist.
- Seek Feedback: Share your drawings with fellow artists or online communities. Constructive feedback can provide valuable insights and inspiration.
- Stay Patient: Drawing complex subjects like roses requires patience and attention to detail. Take your time and enjoy the process.
Incorporating Roses into Larger Compositions
Creating Floral Arrangements
Once you feel comfortable drawing:kkboxly= a Rose, consider incorporating roses into larger floral arrangements. This exercise can enhance your understanding of composition, balance, and the interaction between different elements in a drawing. Here are some ideas to get you started:
- Bouquet Arrangements: Sketch a bouquet of various flowers, with roses as the focal point. Experiment with different flower types, colors, and arrangements to create a visually appealing composition.
- Vase Display: Draw a vase filled with roses and other flowers. Pay attention to how the stems interact with the vase and how the flowers’ arrangement affects the overall look.
- Garden Scene: Illustrate a garden scene where roses play a central role. Include other garden elements like greenery, pathways, and additional flora to create a cohesive and detailed landscape.
Integrating Roses into Portraits and Figures
Adding roses to portraits or figures can enhance your artwork and convey emotions or themes. Here’s how you can achieve this:
- Portrait Adornments: Add roses to a person’s hair, clothing, or accessories. Consider how the flowers’ placement impacts the portrait’s mood and composition.
- Symbolic Representation: Use roses as symbols in your artwork to convey messages or emotions. For example, a single red rose might represent love, while a wilted rose could symbolize loss or sadness.
- Tattoo Designs: Create tattoo-inspired designs that incorporate roses with other elements like animals, skulls, or geometric patterns. Focus on clean lines and bold contrasts to capture the tattoo aesthetic.
Overcoming Common Challenges
Drawing Complex Petals
Roses can be intimidating due to their intricate petals. Here are some strategies to tackle this challenge:
- Break Down the Structure: Analyze the rose’s petal arrangement, starting with simple shapes before adding complexity. Begin with larger, outer petals and gradually work towards the center.
- Use a Light Hand: Keep your initial sketches light and loose. This approach allows you to adjust petal shapes and placement without committing to heavy lines.
- Practice Different Perspectives: Draw roses from various angles and perspectives to build confidence and understanding. Experiment with top-down, side, and tilted views.
Achieving Realistic Shading
Shading can make or break the realism of your drawing:kkboxly= Rose. Follow these tips to enhance your shading skills:
- Identify Light Sources: Determine where the light source is in your composition. Use this information to guide your shading, ensuring consistency across the drawing.
- Layer Shading: Apply shading in layers, starting with light pressure and gradually building up darkness. This technique allows for smooth transitions and avoids harsh lines.
- Use Blending Tools: Employ blending stumps, tissues, or cotton swabs to soften and merge pencil strokes. This technique creates a more natural and cohesive look.
Maintaining Proportions
Proportions play a crucial role in creating a balanced and realistic rose drawing. Here’s how to maintain accurate proportions:
- Use Guidelines: Begin with basic shapes and guidelines to establish proportions before adding details. This technique helps ensure consistency and balance.
- Measure with Your Pencil: Hold your pencil at arm’s length to measure distances and angles. Use your thumb to mark lengths, then compare these measurements across different parts of the rose.
- Check Symmetry: Regularly step back and assess the drawing’s symmetry. Compare each side of the rose to maintain balance, especially in frontal or symmetrical compositions.
Exploring Digital Tools for Rose Drawing
Digital Drawing Software
Digital drawing software opens up a new realm of possibilities for artists. Programs like Adobe Photoshop, Corel Painter, and Procreate offer a variety of tools and brushes that mimic traditional media. Here’s how you can leverage these tools for rose drawing:
- Custom Brushes: Use custom brushes to simulate different textures, from smooth petals to rough leaves. Experiment with settings to achieve desired effects.
- Layer Functionality: Take advantage of layers to separate different elements of your drawing. This approach allows for easy adjustments and non-destructive editing.
- Color Adjustments: Utilize digital tools for precise color adjustments, blending, and layering. Digital platforms enable you to experiment with color without commitment.
Online Resources and Tutorials
Online resources provide a wealth of information and inspiration for artists. Consider exploring:
- YouTube Tutorials: Search for video tutorials that demonstrate rose drawing techniques. Visual demonstrations can offer new perspectives and methods.
- Art Communities: Join online art communities and forums to connect with fellow artists. Sharing your work and seeking feedback can lead to valuable insights and motivation.
- Reference Libraries: Access online reference libraries that offer high-quality images of roses. Studying different varieties and perspectives enriches your understanding of the subject.
The Artistic Significance of Roses
Symbolism in Art
Roses hold rich symbolism in art, representing various concepts depending on their color, number, and context. Understanding this symbolism can add depth and meaning to your artwork:
- Love and Romance: Red roses commonly symbolize love and passion. Including them in your artwork conveys strong emotional connections.
- Purity and Innocence: White roses often represent purity and innocence, making them ideal for themes of new beginnings or spirituality.
- Mystery and Intrigue: Black roses, while less common, evoke mystery, intrigue, or even mourning. Use them to convey complex emotions or darker themes.
- Friendship and Joy: Yellow roses symbolize friendship and joy. Incorporate them into cheerful or celebratory scenes to convey happiness. Click Here
Historical Context
Throughout history, artists have incorporated roses into their work to convey specific messages or themes. Examining historical examples can inspire your own art:
- Renaissance Art: Renaissance artists frequently included roses in still-life paintings to symbolize love, beauty, and the fleeting nature of life.
- Victorian Era: In the Victorian era, the “language of flowers” attributed specific meanings to different rose colors. This symbolism enriched portraiture and decorative arts.
- Modern Art: Contemporary artists continue to explore roses as a subject, experimenting with abstraction, color, and form to convey modern themes.
Final Thoughts
Drawing:kkboxly= Rose offers a unique opportunity to blend technical skill with creative expression. Whether you pursue realism or abstraction, the rose serves as a versatile and timeless subject that captivates artists and viewers alike. As you embark on your journey to master rose drawing, remember to embrace experimentation, practice regularly, and seek inspiration from the world around you. The beauty and complexity of roses await your artistic interpretation, inviting you to explore their many facets and create stunning works of art.
[…] for Neighbors: Create handmade holiday cards and deliver them to neighbors. Add a cute message or drawing to brighten their […]
[…] appeal extends beyond traditional embroidery, finding its way into contemporary culture and artistic […]